Preamble (skip this if you only want the How To)
If you are a Windows software developer and/or distributor, then, by all means, you are well aware that you should always digitally sign your software, so that a minimum level of accountability and trust can be established between yourself and your users.As you should also know, this process is usually accomplished by acquiring a Windows Authenticode credential (a credential is a certificate + its associated private key) which can then be used to digitally sign binary executables.
However, one must also consider the security aspect of the signing process and realize that, given the faintest opportunity, ill-intentioned people will try to grab your code signing credentials, if they can. For instance, perhaps you are already aware that the NSA's stuxnet virus was signed using credentials that were stealthily duplicated from JMicron and Realtek, and that, outside of state sponsored endeavours, malware authors are also exceedingly interested in acquiring data they could use to steal the identify of a trustworthy person, even more so if that person or entity is producing popular software.
 |
| (Image credits: Yubico.com) |
Therefore, as a code signing developer, you're only ever one dodgy software installation away from finding that your credential(s) and protectivve password(s) have been exfiltrated into very wrong hands indeed...
As a result, it doesn't take a paranoid person to realize that storing credentials on disk, even if it's a removable USB flash drive, that you only plug when signing binaries, is a very very bad idea. Similarly, if your alternative is to store your signing credentials into the Windows certificate store, and expect that it'll be enough, you should probably realize that the level of a software-only security solution on Windows goes about as far as the distance you can throw a chair... with Steve Ballmer sitting on it.
Thus, what you really want, is have your credentials stored on a dedicated removable device, that's designed precisely to protect that kind of stuff. And this is where FIPS 201 Personal Identity Verification (PIV) devices, and especially the convenient and relatively affordable YubiKeys from Yubico come into play.
For the record, most of the process described below can likely be applied to any FIPS 201 PIV device, but since YubiKeys are what I use, I'll focus only on YubiKey usage.
Prerequisites
First of all, it is important to note that not all YubiKeys are created equal. Especially, the cheapest YubiKey model does NOT have PIV support. Thus, if you plan to use a YubiKey for the purpose of signing code, you should steer away from the FIDO U2F Security Key model, as it is incompatible with this procedure. With this being said, the prerequisites are as follow:
- Any YubiKey model EXCEPT the FIDO U2F Security Key. My preference goes for the YubiKey 4, but anything that has the PIV feature will do.
- Your code signing credentials, which you have obtained from your Certification Authority, temporarily saved as a
.p12file (Note: You may have to use the Windows certificate store export feature to get to that file, and follow the procedure highlighted here, if your CA only delivers signing credentials into the certificate store) - The latest version of YubiKey PIV Manager, which you should download and install from here.
Storing your code signing credential into a YubiKey
- Open PIV Manager (
pivman.exe). You may have to go fetch it from its installation directory if it did not create a Start menu entry, as was the case on my machine:
- Plug your YubiKey. If this is the first time you use it, you will be greeted by the following screen asking you to set a PIN:
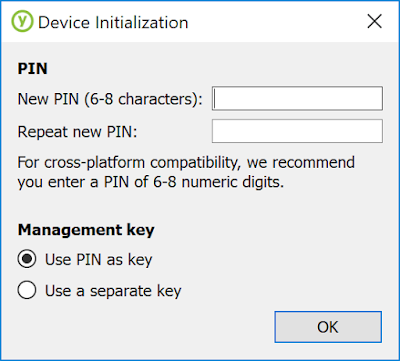
Under "Management Key" you should keep the "Use PIN as key" option checked.
On the other hand, since you're going to use that key for code signing on Windows, you can disregard the cross-platform compatibility recommendation, as I haven't seen any issues with using a PIN with extended alphanumeric characters on Windows, and, with a length of 8 characters, the PIN is already short enough as it is.
One thing I should point out is that, just like with a credit card, the device only gives you 3 attempts at entering the right PIN before locking itself (which is exactly what you want from a device that stores valuable data) so keep that in mind when you use it. Of course, a YubiKey can always be reset if locked, but you will lose access to the credentials stored on it. - Once you have set the PIN, you should see the following screen, where you need to click the "Certificates" button:

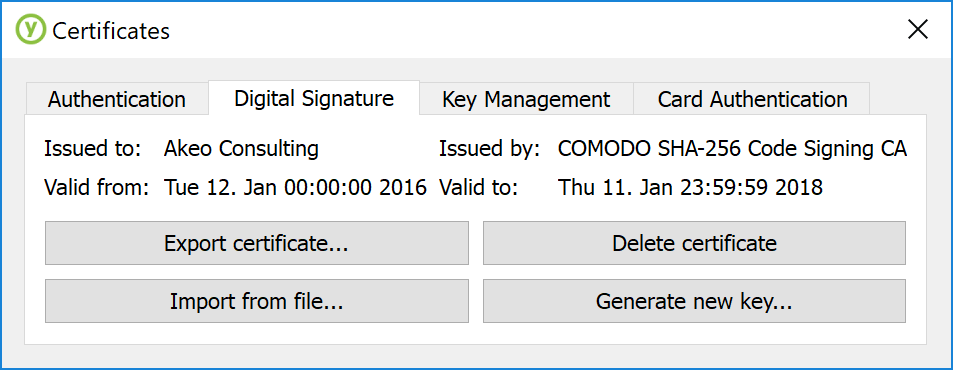
- On the Certificates screen, select the "Digital Signature" tab:
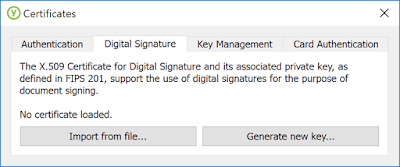
- Click "Import from file" and select your
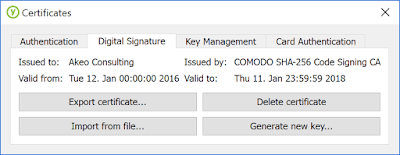
.p12code signing credential. You will be prompted by a password, which of course is the password for the private key of your.p12(and not the key's PIN). - If everything goes well, you will see the following notice, which you should follow by unplugging your YubiKey:

- After re-plugging your YubiKey, and going back to the "Digital Signature" certificate, you should see details about the installed credential, which is ready to be used for code signing:


Bonus: Storing more than one code signing credential onto your YubiKey
If you are producing Windows software that still needs to target platforms like Vista or XP, you might be saying: "That's all very well, but what if I need to sign my software with both an SHA-1 and SHA-256 Authenticode credential? There's only one Digital Signature slot on the YubiKey after all..."Well, the thing is, this is one of the exact issues I have been faced with for Rufus, and I can tell you that, as far as code signing is concerned, the labels assigned to the certificate/credential storage slots are pretty much irrelevant. You can use any of these 4 slots to store any code signing credential you want (since they are referenced by their fingerprint), and we only used the "Digital Signature" PIV slot because that's the one that makes most sense for storing a code signing signature. However, if you also want to store an SHA-1 credential, you can use any of the remaining slots to do that.
My preference is to use the optional "Card Authentication" slot to store your extra SHA-1 credential (so that you can use the "Authentication" and "Key Management" for actual authentication or key management if you ever need to). At least, this is what I have been doing for double-signing my Rufus application, and neither
SignTool or the YubiKey seem to have any trouble with that.Using the stored credentials with SignTool
Okay, so you have your code signing credential(s) safely stored on a secure YubiKey. Now what?
Clearly you can't use
SignTool in the usual fashion, where you reference a local .p12 or .pfx file.Instead, and especially if you have multiple code signing credentials residing on it, because the YubiKey is automatically detected as a credentials storage device by Windows, what you want to do is reference your credentials by their unique SHA-1 fingerprint in SignTool, and let Windows/YubiKey handle the rest. This is exactly what the
/sha1 flag of SignTool is for.However, before we can do that, we need to figure out the SHA-1 fingerprint of your certificate.
The simplest way to do that, while ensuring that you are really going to be accessing the credentials that you want to access, is:
- Go back to PIV Manager, and open the slot where the credential you are after resides:
- Click "Export Certificate" and save the file as a .crt (you will need to type the extension as part of the file name)
- Double click on the .crt you just saved and go to the "Details" tab
- Scroll down to the "Thumbprint" field (should be the very last) and copy its content. This is the SHA-1 fingerprint you are after:

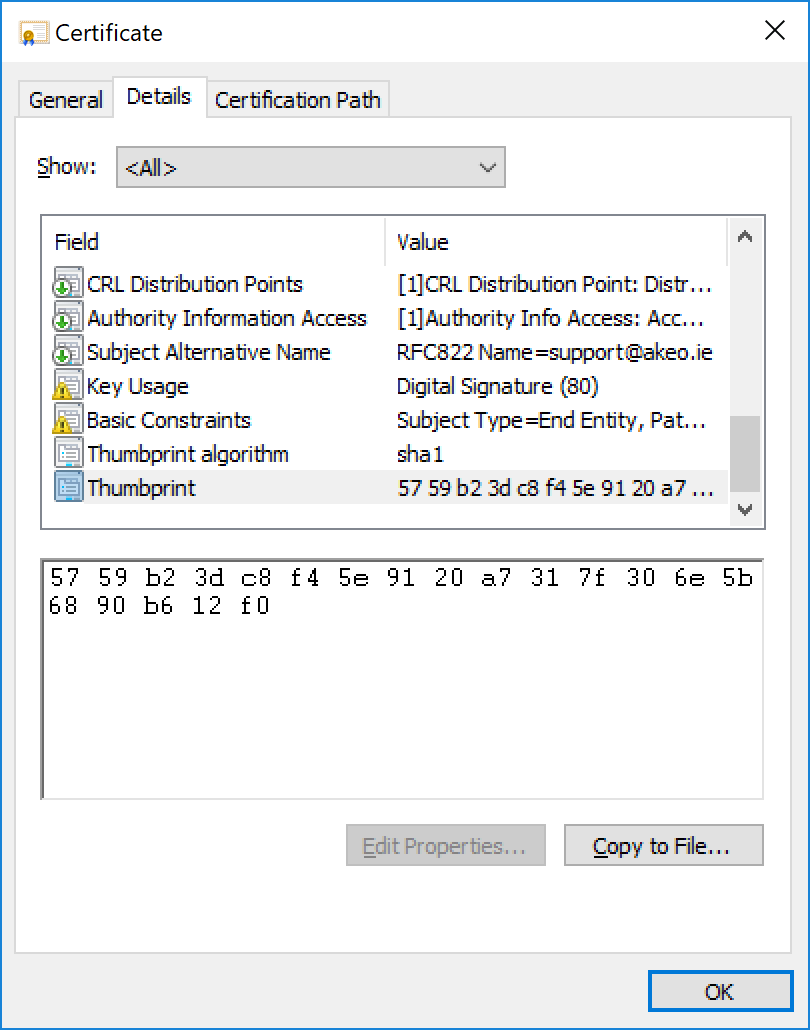
SignTool with /sha1 instead of /f and when you do so, you will be prompted to plug your YubiKey (if it isn't plugged in) as well as your PIN, which, if you enter successfully, will enable the signature operation.I'll conclude with a real life example, using a YubiKey 4 where I store both an SHA-256 code signing credential (fingerprint
5759b23dc8f45e9120a7317f306e5b6890b612f0) and an SHA-1 credential (fingerprint 655f6413a8f721e3286ace95025c9e0ea132a984), that I use to sign and timestamp the dual SHA-1+SHA-256 Rufus binary:SignTool sign /v /sha1 655f6413a8f721e3286ace95025c9e0ea132a984 /fd SHA1 /tr http://sha256timestamp.ws.symantec.com/sha256/timestamp rufus.exe SignTool sign /as /v /sha1 5759b23dc8f45e9120a7317f306e5b6890b612f0 /fd SHA256 /tr http://sha256timestamp.ws.symantec.com/sha256/timestamp rufus.exe
IMPORTANT NOTE: Do *NOT* let Windows install the Yubikey Minidriver as part of Windows Update!
It looks like the latest versions of Windows insist on installing a Yubikey Minidriver, which ends up wrecking havoc on your ability to actually use a Yubikey as a signing device. If you let Windows have its way, you may end up getting the a message stating The smart card cannot perform the requested operation or the operation requires a different smart card when attempting to sign your binary:

If you get this issue, just go to your installed software and delete the Yubikey Smart Card Minidriver:

Once you have done that, you should find that you can use your Yubikey for signing applications again.
Or, if you want to use the MiniDriver, you can follow the steps highlighted here.
Final words
Now that you've seen how to do it, I would strongly urge you to go and purchase a YubiKey (or any other FIPS 201 PIV device) and NEVER, EVER again store code signing credentials on anything else than a secure password protected device that was designed precisely for this.This means that, once you have done all of the above and validated that it works, you should DELETE your
.p12/.pfx and remove any trace of your credential(s) from your computer.Of course, if you are really worried, you may still choose to store a copy of said credential(s), on a backup CD-ROM (preferably in a password protected archive), that you'll only store in a locked place. But by all means, if you have a working YubiKey, you should not let your code signing credential(s) anywhere near any of the computers that you own!